User Page
The DATNASS system provides a user-friendly graphical interface for managing user accounts, groups, shared resources, and volume access permissions. This section documents how to view, create, edit, and delete users using the web UI.
Navigation
From the left-hand sidebar, click on:
- User → Manage system users
- Group → Manage user groups
- Share, Volumes, and Snapshots provide additional access and management options for data handling.

Viewing Users
To access the User interface:
- Click User in the left navigation menu.
- All current users are listed with the following details:
- Username
- UID (User ID)
- Built-in (Yes/No)
- Full Name
User Detail View
Click on a user to expand details:
| Field | Description |
|---|---|
| GID | Group ID |
| Home Directory | User’s home directory path |
| Shell | Default shell |
| Password status | Password configuration status |
| Lock status | Whether account is locked |
| Samba Authentication | Samba access enabled/disabled |

Adding a New User
To add a new user:
- Click the Add User button in the top-right corner.
- Fill in the following fields:
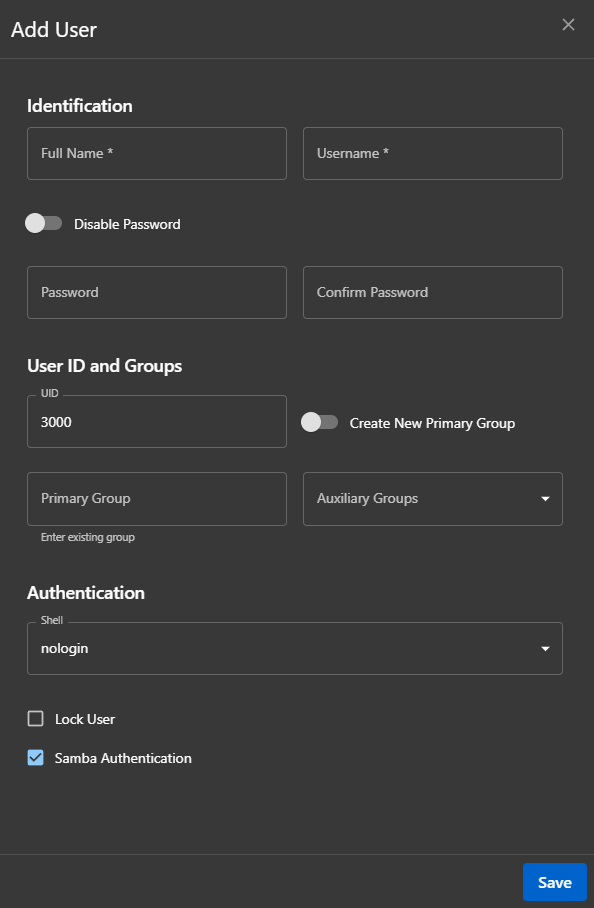
Identification
| Field | Required | Description |
|---|---|---|
| Full Name | Yes | Display name of the user |
| Username | Yes | Unique login identifier |
| Password | Yes | Account password |
| Confirm Password | Yes | Must match password |
| Disable Password | No | Option to disable password authentication |
User ID and Groups
| Field | Description |
|---|---|
| UID | Defaults to 3000 or next available ID |
| Create New Primary Group | Toggle switch to create a new group |
| Primary Group | Assign an existing primary group |
| Auxiliary Groups | Optional additional group memberships |
Authentication
| Field | Description |
|---|---|
| Shell | Choose a shell (e.g., /bin/bash, nologin) |
| Lock User | Toggle if account should be disabled |
| Samba Authentication | Toggle if access to Samba shares is needed |
- Click Save to create the user.
Editing a User
- In the User List, click Edit on the desired user.
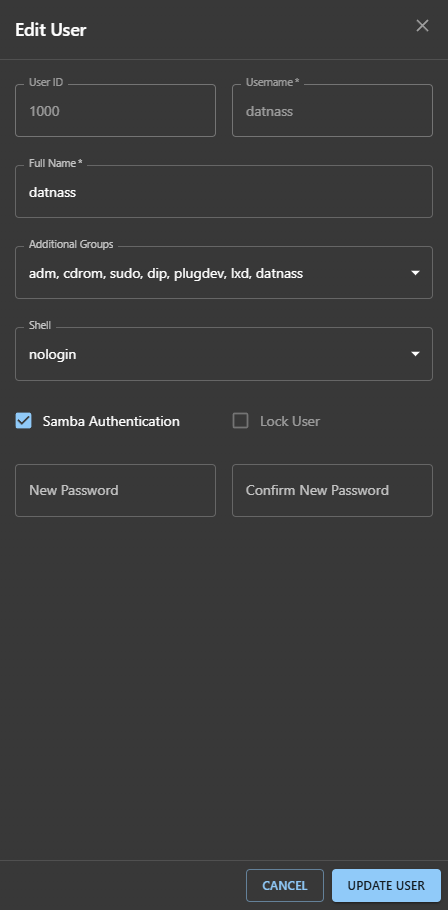
- Update any of the following:
- Full Name
- Additional Groups
- Shell
- Password
- Samba Authentication
- Lock User status (disable)
- Click Update User to apply changes.
Deleting a User
- Click the Delete button for the user.
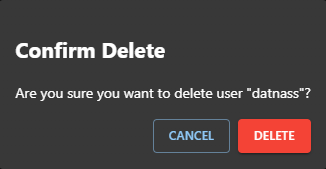
- A confirmation dialog will appear:
- “Are you sure you want to delete user username?”
- Click Delete to confirm or Cancel to abort.
Warning: User deletion is permanent and cannot be undone. Ensure you have backups of any important user data before deletion.